Rails 2.3.0 + IIS7 + FastCGI = Rails on Windows FTW!
I love Rails, and I run Windows. There, I said it. I know many Railers scoff at us, mock us, etc. Whatever. I run Windows (Vista, specifically). I’m a Microsoft.Net Web Developer at my day job. My company has invested heavily in the Microsoft platform. I don’t like WebForms (why is a topic for another post), and, because of Rails, I know there is a better way to do web development. Yes, I know about ASP.Net MVC, but I have yet to try it. What I have tried is Rails, and I know that a Microsoft stack is the way to get it into my day-to-day work. So, a couple of days ago, with the announcement of Rails 2.3.0 rc1 I decided to see if I could get the latest Rails running under IIS 7 on my Vista notebook. I tried to find directions on how to accomplish this, but none were very straight forward. So, I’ve decided to document the process here for myself and other WinRailers. Note: 2.3.0 rc1 will not work, due to this bug in Rails' FastCGI handler. Fortunately, this was fixed and merged into the rails source. You will need the 2.3.0 gem installed, though, to generate a 2.3 Rails app. I’ll go into details below.First, Credit where Credit is Due
I can’t take all the credit for this. The following two articles helped to guide my down my path:- 10 steps to get Ruby on Rails running on Windows with IIS FastCGI
- Ruby on Rails in IIS 7.0 with URL Rewriter
Software You’ll Need
- IIS 7 (Windows Server 2008, or any version of Vista SP1 that has IIS)
- The Microsoft Web Platform Installer
- Ruby One-Click Installer 1.8.6-26 Final Release
- msysgit
- SQLite3
The Steps You’ll Take
- Enable FastCGI support in IIS7
- Install URL Rewrite module
- Install Ruby
- Install msysgit
- “Install” SQLite
- Update Rubygems
- (gem) Install Rails
- Create a Rails app
- Grab the latest Rails 2.3 from github
- web.config
- Setup up web site in IIS
1 - Enable FastCGI support in IIS7
IIS7 supports FastCGI natively now. You just need to make sure you install CGI support. It was not obvious to me that this was needed. I was looking for a FastCGI option, but it is listed as plain old CGI. Microsoft has good directions on how to accomplish this task on their site, so I will not rehash them here.2 - Install URL Rewrite Module
The easiest way to get this (and keep it updated!) is to use the Web Platform Installer. It might also want to install updated FastCGI support. I let this happen with no ill effects. So, go ahead a check “URL Rewrite” in the installer and go to town.3 - Install Ruby
Luis Lavena has done an awesome job of maintaining the Ruby One Click Installer for Windows. Of particular importance to my little endeavor is that, in the One-Click Ruby Installer 1.8.6-26 Final Release, Luis included ruby-fcgi and the FastCGI C extension. Thanks, Luis! You can safely run the installer and click “Next” all the way through.4 - Install msysgit
Rails developers use git. You need get to pull the latest source, which includes the FastCGI fix I aluded to above. msysgit is your best option. You can safely run the installer and click “Next” all the way through.5 - “Install” SQLite
I use quotes around install because you don’t really install anything. You simply unzip the sqlite-3_6_10.zip file into any folder in your path. Personally, I create a folder,C:\bin, add that to my path, and unzip the files there. I keep other things here, too, like wget.
6 - Update Rubygems
The version packaged in the OCI is old. Save yourself trouble, open up a command prompt, and:gem up --system
7 - (gem) install Rails
You need to have Rails installed. Rails 2.3.0 rc1 has some undeclared dependencies. So, first:gem install test-spec rack
Next,
gem install rails --source http://gems.rubyonrails.org
8 - Create a Rails app
Most of my code goes into the following folder: C:\Development. Assuming this directory does not exist:- Open a command prompt
c:cd \mkdir Developmentcd Developmentrails myapp
9 - Grab the latest Rails from github
This is where msysgit comes in. Fire up Git Bash, and:
cd /c/Development/myapp/vendorgit clone git://github.com/rails/rails.git
10 – web.config
The IIS team, under Scott Guthrie (also oversees ASP.Net, particularly ASP.Net MVC), have done some awesome stuff in the last couple years. They have turned IIS 7 into, in the words of Software Journeyman Corey Haines, “A respectable web server”. I agree. IIS 7 is a lot more like Apache than it ever used to be, and I think this is a good thing.
One of the nice things is that you can now move a bunch of your web server configuration into a web.config file in your application. That means you can add it to version control :)
ASP.Net programmers will be intimately familiar with this file. Everyone else can think of this file as the equivalent of Apache’s .htaccess files. In our case, we’ll use the following web.config to configure both the FastCGI handler and the URL Rewrite rules:
<?xml version="1.0" encoding="utf-8"?>
<rule name="Rewrite app_offline.html if file exists" stopProcessing="true">
  <match url="^.*$" ignoreCase="false" />
  <conditions>
    <add input="{DOCUMENT_ROOT}/app_offline.html" matchType="IsFile" ignoreCase="false" />
    <add input="{SCRIPT_FILENAME}" pattern="app_offline.html" ignoreCase="false" negate="true" />
    <add input="{SCRIPT_FILENAME}" pattern="^(.+).(png|gif|jpg|css|js)$" ignoreCase="false" negate="true" />
  </conditions>
  <action type="Rewrite" url="/app_offline.html" />
</rule>
So, let me explain what is going on here. First, the handlers section. This is where we set it up so that the FastCGI handler will process requests for dispatch.fcgi with the ruby interpreter, and run myapp in development mode. To run in production, simply replace development with production.
The next section is the URL Rewrite section. As you can see, it is much more, um, expressive than Apache’s syntax. Anyway, another cool thing Microsoft has done with IIS7 and the URL Rewrite module is an Import function. This allows you to import your existing mod_rewrite rules into their format. Cool! So, that’s what I did. I took some existing mod_rewrite rules for FastCGI, and popped it in to the UI to get the markup above.
You’ll notice a section that is commented out. That is an attempt to get the app_offline.html file working. That is, if the file exists, your app is in maintenance mode, and all requests for any Rails route should instead have this served up. I wasn’t able to get this working. Perhaps someone can take a look at it with fresh eyes.
11 – Set up web site in IIS
This one is crazy simple. Create a new website, with the physical path set to the public directory of your Rails app. So, in our case, that would be: C:\Development\myapp\public
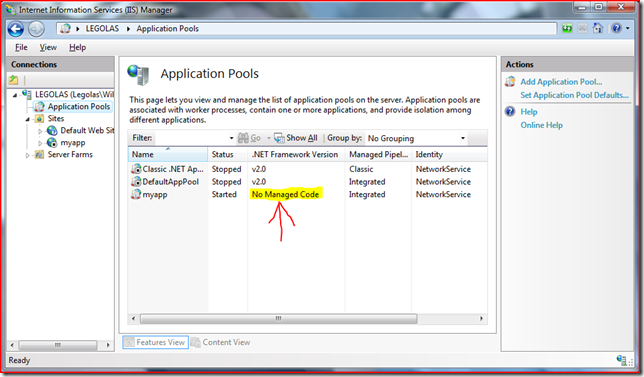
There is one more thing that I do, but I don’t know if it necessary. For the Application Pool that was created for this site, I change the “.Net Framework Version” to “No Managed Code”. The Rails app is not a .Net app, so I see no reason to turn on managed code for this app.

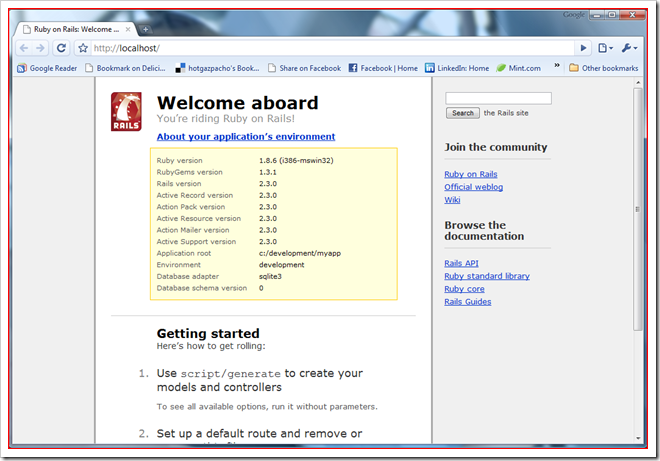
That's about it! No, seriously. It is that easy. Don’t believe me? Open up a web browser and go to the web site you created (localhost for me). Click on “About your application’s environment”, wait a bit for the FastCGI process to spin up, and voila:

